Uncategorized How to fix: The plugin does not have a valid header. Are you having an issue with your plugin not having a valid header? Have you been pulling out your hair trying to figure this out? If so, don’t worry – we are here…
How-To How to fix: 404 not found Nginx Error. You know how frustrating it can be if you’ve encountered the dreaded “404 not found” error while using Nginx. This error means that the server cannot find the requested resource, and it’s a…
How-To How To Update PHP 7.2 To PHP 7.4 And PHP 8.0 On VestaCP In this blog, I will show you how you can update VestaCP PHP version 7.2 to PHP 7.4 and PHP version 8.0 on Linux Ubuntu 18.04. First, double-check which PHP version your server…
How-To How to use a PPK file in Mac Terminal Do you have a PPK file that you need to open in Mac Terminal? Don’t know how to do it? Not to worry, this blog post will show you how. We’ll walk you…
How-To Command ‘ghost’ not found [Solved] If you’ve been using the Linux terminal for a while, what if you try to type it in and get an error message like this? “Command ‘ghost’ not found.” What do you do…
VestaCP Exim paniclog has non-zero size, mail system might be broken. If you’re seeing a message like “Exim paniclog has non-zero size, mail system might be broken” in your Exim log file, don’t worry – you’re not the only one. This is a common…
How-To How to fix: Bing Maps default location Bing Maps is an excellent resource for finding directions and locations, but the default location can be tricky to change. This post will show you how to fix the Bing Maps default location…
How-To How to clear the Varnish cache on Cloudways If you’re using Cloudways, and you notice that changes to your website are not taking effect, it might be time to clear the varnish cache. This process is simple and only takes a…
How-To WP-PageNavi Plugin 404 error Scanning my website, I noticed many 404s coming from navigation pages (e.g., /page/27/); I recently increased the number of posts that show up on the blog pages, creating an error from the wp-pagenavi…
How-To How to change CPT’s Archive Title Tag Have you ever wanted to change the title of your Custom Post Types Archives page in WordPress but didn’t know how? It’s a pretty simple process, so without further ado, let’s get started!…
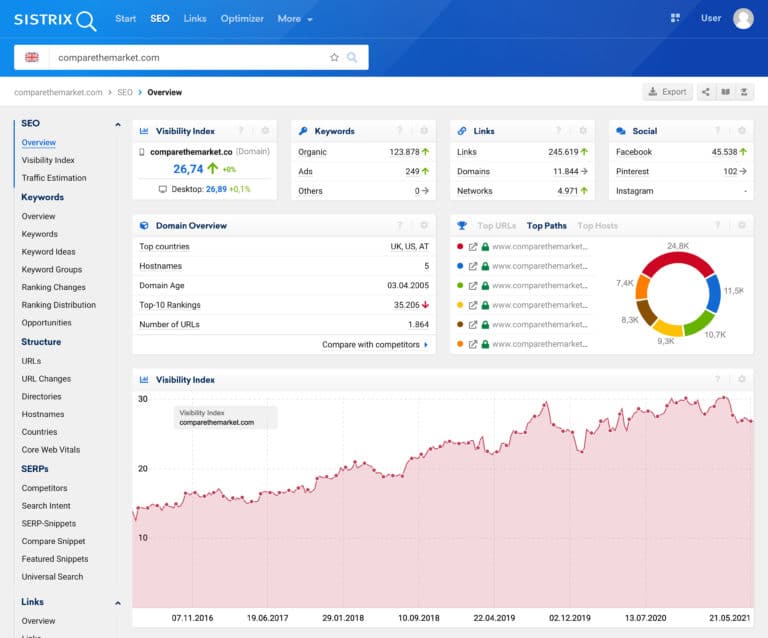
How-To How to Cancel Sistrix Are you considering canceling your Sistrix account? Well, you’re in luck – we’re here to show you how. Keep reading for a step-by-step guide on how to cancel your subscription. We know that…
How-To How to add a Meta Description to the Custom Post Type Page in WordPress You’ve just created a new custom post type in WordPress, and now you’ve noticed the primary Custom Post Type (CPT) page is missing a meta description. No worries, we’ll show you how to…
Gravity Forms Gravity Forms Error: There was an issue creating your form The message “There was an issue creating your form.” is one of the most annoying messages a WordPress developer can receive. But don’t worry! Some common fixes usually work for this problem. Inspect…
How-To How to Redirect URLs using Regular Expressions (Regex) in WordPress Regular expressions are a powerful tool for web developers and programmers. In this blog post, I discuss how to use them in WordPress with the Redirection plugin. The plugin has many useful functions…
How-To How to search and replace URLs in Visual Composer (WP bakery) This post will show you how to search and replace URLs in Visual Composer using Search Regex. This is a great way to bulk-replace thousands of URLs in minutes! Just a word of…
WordPress How to remove PageBuilder Shortcodes from a website Do you ever find yourself in need of removing PageBuilder shortcodes from your WordPress website? If so, this article will help guide you through the process. When rebuilding a new website, I want…
Discord Dank Memer Commands “Dank Memer Commands” is a collection of dank memey commands sure to make you say, “wtf?” This list includes the likes of dank memes like “foodporn,” “blacktwitter,” and even “tifu.” With this list,…
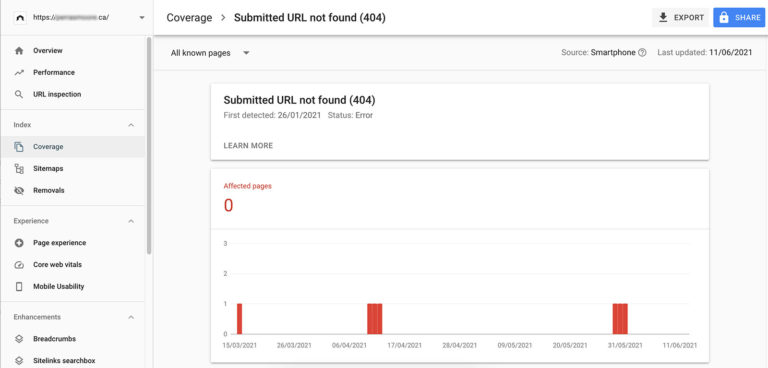
Google Search Console How to fix GSC Error: Submitted URL not found (404) Google Search Console is a powerful tool for marketers. It allows you to monitor your website’s performance in Google Search Engine Result Pages (SERPs) and identify issues, as well as receive notifications about…
How-To The Ultimate Guide to Setting Up Your Unifi Solarpoint Solar Panel System This guide will help you set up your Unifi Solarpoint system quickly and conveniently. We’ll walk you through the process from start to finish, giving you everything that we know about this product…
WordPress How to migrate your website to WPEngine WordPress is a popular blogging platform that allows users to create and manage their own blogs with ease. It has become the go-to solution for many people looking to publish content online with…